NEWS UPDATE: New Rode Videomic Pro

The Videomic Pro has been the go to on camera mic for videographers since it first arrived back in 2011.

As an on camera, scratch audio, interview microphone its been amazing, and now Rode have made it better!.

The new Videomic Pro comes with Rycotes lyre suspension system which is now found on all of their on camera video mics (the video mic pro being the last to incorporate the rycote lyre system). This means that the mic now has some world renowned vibration and handling noise isolation, meaning less bumps an knocks being picked up, giving you smoooth audio while on the run.

Other improvements to the mic include an all new capsule design and lower self noise, ultimately giving you crystal clear high quality audio.

You can check it out over at www.rodemic.com or check out the video below.

NEWS UPDATE: NEW Sennheiser AVX Wireless system

Just when you thought it was safe to hit the ‘BUY’ button, Sennheiser have released a new digital wireless system to compete with Rode’s RodeLink Digital system.

Called the ‘Sennheiser AVX’ the system operates in the license free 1.9GHz frequency range (the same spectrum as wireless) which means it can be used in many countries without the purchase of a license. This may cause issues in more crowded built up areas, but its hard to know until real world testing of the units themselves.

The AVX has some clever technology built-in. The XLR plug on receiver automatically powers on with the cameras 48v phantom power, it automatically sets the correct audio level, as well as selecting the best available frequency. If any interference is detected it will automatically change frequencies.

The unit also has built-in ‘adaptive power transmitting’ which basically means that the system only uses the power needed to maintain a reliable connection between the microphone and receiver. So if you are in a less crowded frequency spectrum or the receiver and transmitter are fairly close to one another the units will use less power and vice versa.

The units all have built-in lithium-ion batteries which can charged via a usb port, with a battery indicator located on all units so no nasty surprises while in use.

The AVX system comes in 3 flavours, the first a handheld microphone set called the AVX-835 which comprises of a hand-held microphone transmitter and a plug-in receiver which connects directly to the xlr of your audio recorder or camera.

AVX-835-Set

The second is Lavalier set called the AVX-ME2. This comprises of a bodypack transmitter with ME2 lavalier microphone and the xlr plug-in receiver.

me set

The third and final set is the Lavalier Pro or AVX-MKE 2. This set includes the bodypack transmitter, MKE 2 clip on microphone and the xlr plug-in receiver.

sennheiser-avx-mke2-set-4-us-800x800

All the packages come DSLR ready with an xlr-mini jack audio connector and hot shoe mounting accessories.

So there you have it, whether or not it will replace the tried and tested G3 system remains to be seen, but an interesting advancement none the less. To find out more follow the link below.

http://en-uk.sennheiser.com/avx

NEWS UPDATE: Sennheiser and Apogee join forces

Released this last week at Music Messe in Frankfurt, Germany. Sennheiser and Apogee have joined forces to bring you 3 great new products.

The first being ‘ClipMic Digital’ the first Clip on microphone accessory for IOS that connects directly via the lightning connector with a built-in signal converter developed by Apogee. This allows you to record up to 24 bit 96kHz audio if you so wished, directly to your iPod, iPhone or iPad, making it great for on the go recordings, interviews and more.

SennheiserApogeeClipMic digitalWeb(1)

sennheiser-apogee-clipmic-digital

The second product is the ‘MKE 2 Digital’ similar to the ClipMic Digital’ but aimed at the pro market with its higher spec condenser clip on microphone which comes from Sennheiser’s world-renowned radio lavallier microphones. Again it can record up to 24 bit 96khz audio with the accompanying app and can be used for a range of mobile audio recording and video audio solutions while on the go with no need for a wireless setup.

SILVER-MKE-2-digital-3quarters-windscreen

Now onto the IOS app, ‘MetaRecorder. Developed by Apogee, MetaRecorder is a 2 channel audio recorder specifically designed for the ClipMic Digital and MKE 2 DIgital Microphones. The app offers up to 24 bit 96kHz audio recording with some great metadata features that will help if using the audio with Final Cut Pro X. The meta data input allows you to add keywords, favourites, markers and more to your audio files while in the field. The audio and XML file can be uploaded to Dropbox (useful feature but could use a lot of your data if not on wifi) Once uploaded it can then be imported to Final Cut Pro, with your audio easy to find due to the meta data attached. A useful app and features i think you’ll agree, i just hope the meta dat xml files also work with other Video editing software.

mics-metarecorder

Some great looking pieces of kit to take on Rode’s own SmartLav+.

*As an aside, MetaRecorder can also be controlled via apple Watch which could be very useful indeed.

NEWS: New RODE BLIMP and more! PART 2

Welcome to part 2 of this new bulletin, dear readers.

Next up is the ‘SmartLav+’. Rode’s new Lav microphone for use with android and ios devices.

smartlav-plus_large

Rode Smart Lav+

Aimed at those looking to record interviews on the go while also shooting video. The smart lav allows you to plug the microphone directly into your chosen android or ios device, pick your chosen audio capture app, hit record and away you go.

In the box with the microphone you get a pop/wind filter to slide over the top of the mic to help keep breezes and plosives at bay, and a neat little clip that enable you to clip the lav mic to your interviewee.

The Smartlav+ is a great idea if you dont have any other options to hand, or if you need to get a clear, high quality audio interview while on the go, but not being able to check your audio levels (if you are also filming at the same time) as you record, with the device recording the sound being tucked in your interviewees pocket could be a problem in the long run…

But Rode have also come out with some useful cables and a small device that may well help you be able to see your audio levels, monitor them and record more than one Smartlav+ at the same time. And here it is the Rode ‘SC6’:

sc6_large2

Rode SC6

The SC6 is an input/output breakout box that allows you to monitor your audio, while recording up to two input sources (unfortunately only to 1 mono channel) using a TRRS plug that connects to your smartphone. Using the RodeGrip you could mount your smartphone with an SC6 and Smartlav’s to your camera enabling you to film and record great audio in a self contained and very portable setup.

Along with the SC6 Rode have also released the SC2, SC3, SC4 & SC7.

The SC2 is a high quality coiled 3.5mm TRS patch cable, ideal for connecting the output of your chosen audio recording device to you camera for a scratch audio track.

sc2_large

Rode SC2

The SC3 is a high quality adapter with a 3.5mm TRS connection and a TRRS connection to allow a Smartlav to be connected to a camera or audio capture device. It has a handy colour coded grey end that matches the end of the Smartlav to indicate they can be used together.

sc3_02

Rode SC3

The SC4 is a high quality adapter designed to allow microphones with a 3.5mm output to be connected to smartphones and tables with a TRRS input connection. Even though the SC4 is primarily aimed at the Apple market it can also be used for most Android devices also.

sc4_01

Rode SC4

Finally, the SC7 is designed to be paired with the Videomic Go, Rode’s budget video microphone. The red cable is colour matched to the TRS-TRS cable that comes with the Videomic Go, the only difference between the two is that the SC7 has the grey colour coded end to denote it is a TRRS connection, which can be plugged into any smartphone or tablet.

sc7_02

Lots of useful accessories coming from Rode, but thats not all there is one last piece of news for you all. Rode have released a NEW studio microphone called the ‘NT-USB’.

The NT-USB is a side address USB condenser microphone with a fixed cardioid polar pattern. Being a USB microphone means that it can be used with Mac or Pc as well iPads when the usb connection kit is connected. It is powered by the USB connection and this is shown with a light on the microphone itself, no light equals no power.

nt-usb03This microphone is great for podcasters, Voiceovers, ADR, Musicians – basically anyone who needs to get great quality audio, but doesn’t want or need  an outboard sound card or audio recording device, as its all done and controlled through the NT-USB itself.

The mic itself has all the controls and connections you need right on it. So on the bottom is the USB connection, on the side is a 3.5mm jack socket for your headphones, and then on the front are two swivel controls, the top for controlling your monitoring signal ie how much of yourself you can hear compared to how much of the playback audio, and below that is the headphone volume control knob so that you can control how loud everything is in your headphones.

In the box you also get a desktop stand for the microphone, a pop shield to help keep those plosives at bay, a bag to keep your microphone in, a 6m usb cable and a mic mount. So basically everything you could ever possibly need to get going straight out of the box.

In conclusion this is a great microphone for those looking to record high quality podcasts, voiceovers and more, without the need for extra interfaces and technology, you can just setup, plug in and away you go, simple, yet achieve stunning results.

Here ends the NEWS for now (phew).
NEWS: New RODE Blimp and more! PART 1

It looks like Rode have been rather busy over the last few months, with lots of great new products now arriving in stores. First up the BRAND NEW and improved ‘Rode Blimp’.

blimp_large

Rode Blimp

And here it is in all its blimpy glory. ‘Whats NEW about this blimp? it looks exactly like the old one’ i hear you cry, well this new blimp is a whopping 25% lighter than the old version. It comes with a heavy duty Mogami cable inside the grip which then spits via a junction box to smaller more flexible cable inside. This in turn helps reduce the transference of any vibration to the microphone. You also get 2 great Neutrik XLR connectors one to connect to the microphone and one to connect to your recorder, this are the defacto standard in connectors and are built like a tank, so no chance of them failing in the harshest of conditions. The  Pièce de résistance of this new blimp is that Rode has joined forces with Rycote who have liscenced their lyre technology to Rode for use, so you now get the fantastic lyre suspension system included, so no more clips and elastic bands to loose!.

blimp_large3

One last thing of note is the adjustable mounts, with size markings. This means you can find the optimum mounting size for each microphone and get it perfect every time just by moving the mounts, which are adjusted with a allen key to loosen and tighten.

So there you have it, the brand new Rode Blimp, which will not only save your arms from getting tired, being 25% lighter, but will also give you the best mounting system at a great price.

Next up is the ‘Rode iXY’ for iPhone 5, 5C, 5S. This little beauty is now compatible with all the newest lightening connector iPhones (and iPads).

ixy_large

Rode iXY Lightning

Once connected to the lightening port of your iPhone or iPad you can record stereo sound with the onboard matched pair of 1/2″ cardioid condenser capsules which are fixed in a 90 degree near coincident setting. Once teamed with a recording app of your choice or Rodes own ‘Rode Rec’ app you can record up to 24bit 96kHz stereo sound, making this a great portable recorder for not only interviews, lectures but grabbing sound bites and sound effects when on the move.

ixy_large4

Rode have thought of everything when designing this little beauty, there is even a built in button so that you can still use the home button on your iPhone or iPad if needs be. In the box you get a padded case for carrying the device around so that it doesn’t get damaged, and a foam windshield to help reduce wind noise when used outside.

This is a great alternative to carrying around a small portable recorder, especially when most people have a phone on them at all times these days. (although its only useful if you own an iPhone or iPad, alas android users currently cant join in the fun).

Last but not least Rode have also updated the ‘Rode Grip’ and ‘Rode Grip+’ for the iPhone 5, 5C and 5S.

rodegripplus_1

This is Rode’s handy (boom tish) ‘multi purpose mounting solution’ which intends to help give you a more stable Grip when using your iPhone for filming, or recording audio. It comes with a hot shoe mount for when using your iPhone as an audio recorder on top of a DSLR camera, a microphone boom stand mount, and can be used as a table top stand for video or audio recording. The RodeGrip+ comes with 3 lenses, 2x telephoto and 1x fisheye so you can go to town making your first all iPhone feature film (or not).

The ‘RodeGrip’ gives you multiple ways to help get better quality video or audio recording while on the move, and is a useful accessory to have if you are looking to use the built in HD video features of your iPhone to capture video blogs, short interviews and more, all contained in a small collapsable and self contained frame that fits in your pocket, Perfect.

NEWS: Zoom Releases new ‘ZOOM H5’

It looks like Zoom have been busy! They have yet another audio recorder, the brand new Zoom H5.

Looking at the specs, its a long awaited upgrade to the H4N, with upgraded mic pre’s (im assuming from its bigger brother the H6) it FINALLY has useable gain controls, 1 for each of its 2 input channels (huzzah no more fiddling in the Menu system). As it has soo many new features here’s a quick run down:

Uses a system of interchangeable input capsules that can be swapped out as easily as the lens of a camera
Includes detachable X/Y capsule (XYH-5) with extended signal capacity and shockmounted mics for reduced handling noise
Compatible with all Zoom input capsules
Four-track simultaneous recording
Large backlit LCD display
Records directly to SD and SDHC cards up to 32GB
Up to 24-bit/96kHz audio in BWF-compliant WAV or a variety of MP3 formats
Two mic/line inputs with XLR/TRS combo connectors each with selectable phantom power and -20dB pad
Analog-style gain controls for each input
Protective “roll-bar” type covers prevent accidental movement of gain controls
Plug-in power (2.5 volts)
Built-in effects, including low-cut filtering, compression and limiting
Chromatic tuner and metronome
Auto-record, Pre-record and Backup-record functions mean that you’ll never miss that perfect take
MS decoding
Multitrack to stereo internal mixdown
Normalize, Divide and Trim editing
Voice memo and up to 99 marks per recording
A/B loop playback
Variable playback speed and variable pitch without affecting playback speed
Multichannel and stereo USB audio interface for PC/Mac/iPad with loop back function
Mountable directly to DSLR or camcorder with optional HS-01 Hot Shoe Mount adapter
Uses two standard AA alkaline or NiMH rechargeable batteries
Over 15 hours of operation with alkaline batteries

Phew! Thats alot of new features, and heres hoping the uk pricing will be nice. Currently its looking at around $249 in the US so hopefully UK wont be too far off.

I cant wait to get my hands on one and test it side by side with the Roland R26 and Tascam D60.

For more info check out https://www.zoom-na.com/products/field-video-recording/field-recording/zoom-h5-handy-recorder

Synching it all together – The options

This month its all about that age old problem, syncing all your recorded audio and film together in the edit. There are 3 ways it can be done… (actually there are 4, but ill leave timecode for another day)

So the three main ways to sync your audio with you video are as follows:

Manually:

This is where taking good notes on set comes in really handy, as well as using a good slate, whether it be a good old manual clapper or an ipad app, anything to give a mark that will be heard on camera and on the external recorder. Ideally there should be some one making a note of all shots taken, which are good and which are bad etc so that when it comes to the edit you can dive straight to the files you need. This list will also aid in making an audio shot list that can be printed and kept to hand. Using Sound Devices Wave Agent software, you can load in all your audio clips and tag them good or bad, add notes, re-name etc and export your finished list to a pdf.

Next step is to load up the audio clips that correspond to your video clips and manually sync them together. The ‘clap’ created at the start of each shot should be easy to spot, so just line up the ‘claps’ exactly and your audio clip should now be in sync, just do this for every single shot, and you are done.

It may take some time (depending on the length of your film) but its worth it in the end.

Using Final Cut Pro X or Adobe Premiere:

With the latest incarnation of Apples Final Cut Pro software you now have the function to sync audio and video automatically. Once you have imported your chosen video and audio files for syncing all you you have to do is select the clips in the event browser, then click ‘Choose clip’->Synchronise clips (or for the shortcut minded of you out there its Command-option-G). And hey presto your clips are magically synced.

The process in Premiere is much the same. This process is called ‘Merge Clips’, all you have to do (and you can do this in either the timeline or project panel) is select the video clip you want to sync audio to, then select the audio clips, right click and choose ‘merge clips’. You will then get a dialog box with some options on how you want to sync these clips ie on an ‘in’ point at the clap of the slate for example, on an ‘out’ point at the clap of a tail slate, matching time code, and based on a marker. Select your preffered sync method and your selected audio clips will be synced to the video clip. Just repeat for each shot.

Plural Eyes:

Made by the company Red Giant, who make some great software for film makers. Plural eyes is designed to do all the heavy lifting so your NLE doesn’t have too. Just load up Plural Eyes, import each camera and audio recording device to its own bin, and away you go.

The difference between this and Final Cut Pro X is that Plural Eyes gives you more options. Alas Final Cut Pro’s implementation isn’t always as perfect so you get left with some un-synced clips that you then have to sync manually by hand. Plural Eyes fixes this problem by letting you do a ‘sync touch up’. This option enables you to select clips that you think should be synced together, or were recorded at the same time, by selecting Choose sync->Synchronise pair of clips. Your previously un-synced audio will now be synced where it needs to be.

Plural Eyes works with all major NLE editors, so once you have synced all your clips you just go to ‘Export’ and select the appropriate NLE you are using. This produces a file that is readable by the NLE, just open up your editor and import the file and all your clips will be placed on the timeline, all nice and synced, looking just like they did in Plural Eyes.

So there you have it, 3 ways to sync your audio to your video. Personally id use a mix of automatic and manual sync to get the best results, as their is no substitute for a bit of human input, computers and software may be amazing these days but they wont always get it absolutely 100% right 100% of the time.

Until next month, bye for now.

Bits and bobs…

You’ve chosen your mics, decided on your mixer/recorder but now you have noticed ‘how the hell do i mount it all on my camera?’ Well if you are looking to mount more than one item to the hotshoe of the camera you can buy a hotshoe extender bar. The lovely people at Rycote have come up with a 10cm and 20cm add on bar to accommodate any accessories you need to mount on top of camera. They also make a great Microphone Mount for hotshoes as well as a mount you can attach your wireless receiver to, enabling you to keep everything on camera. Just be sure to use a tripod as the extra weight added could make your setup rather heavy and cumbersome.

If you have decided to go the portable recorder and sound man route you will need to get yourself a decent boom pole (if the sound man doesn’t have his own that is). These come in various forms Aluminium, carbon fibre and graphite (Carbon Fibre and graphite being the more expensive due to them being much lighter) 3 part, 6 part, internally wired etc.

When picking your boom pole think about three major things 1) How long do i need the pole to be when fully extended 2) Is it portable and do i need it to fit in a certain sized bag or flight case 3) How easy is it to clean and repair (this one is important because you will end up outside in all weathers and conditions and it WILL get covered in mud and dirt no matter how hard you try not to).

Next on the list is a good set of headphones. If your are not monitoring your audio it is a bit like setting up your camera, pointing it where you want and recording without looking through your viewfinder to frame and setup your shot. If you can’t hear what you are recording how do you know it sounds the best it can or if there are any problems?

There are a plethora of options at all price points out there, personally i like the Sennheiser HD25 as they are comfortable, clear, great for monitoring and all parts are user replaceable ie ear cups, headphone cable etc so if you do end up breaking something its very easy to get spares. Other great headphone options are the Sony 7506 or the cheaper Sennheisers. Its always best to get a test before you buy so that you can weigh up how they sound to you against the cost option, as you may find a cheaper option that works for you and what you are doing and need them for. (Thats not to say to scrimp where you can as the expensive headphones are expensive for a reason, which is usually quality and years of industry use and experience). Now on the ‘Do Not Buy’ headphone front, do not, i repeat DO NOT buy anything that is specifically marketed for music like the Dre Beats range or similar. These headphones are designed with an EQ setting in mind to make music sound as loud and punchy as possible. For on set or location recording you need something that is as natural as possible and doesn’t colour the sound in any way, so that you know what you are hearing is as close as possible to the original source sound.

Audio in a DSLR world: The next step

So you have been recording your audio using an on camera microphone and the results haven’t been too bad, mostly workable for what you have been shooting but you can’t help thinking maybe it could be better, and you would be right!

You’ve probably noticed that microphones unfortunately do not have a wonderful zoom feature like your lenses do, so when you have been shooting those lovely long and mid shots that the audio being captured isn’t particularly clear or at times audible. This is down to the fact that the optimum distance for a microphone to be from the source its recording i.e. an actor is about 2 feet or 60cm, which really doesn’t help you when your microphone is attached to your camera and you are 5+ metres away.

Now is the time to think about a ‘Dual’ sound setup. This basically means either recording audio on camera with a high quality mixer enabling you to use better microphones or using a portable external recorder. If you are working on your own as videographer and sound person there are some great options available to you, but first a little about the types of microphones you may need for different situations and scenarios.

1) Outdoors – A ‘Shotgun’ or ‘rifle’ microphone with a Super cardioid polar pattern, which makes them great for out doors. The most common Shotgun microphones are made by Sennheiser, Rode, Schoeps, Audio Technica, Beyer Dynamic and Sony. Usually found on the end of a boom pole but can be used on camera to replace a Rode Video Mic or equivilent.

2) Interview – ‘Lavalier’ microphone. Used for interviews (the little black things you see on the lapels of news readers) these can be hidden about a person if needed, so also come in handy to mic actors when a boom can’t quite reach. They connect to a wireless transmitter pack that sends the signal to a wireless receiver pack that can then be plugged into a mixer or recorder via xlr. You will find these made by most microphone manufacturers, the most popular being Sennheiser, Lectrosonics,  and also Shure’s new FP system.

3) Indoors – Hyper Cardioid microphones, these are great for indoor use as they pick up less reflections due to its design and polar pattern. Shotgun microphones can also be used with good results, its all down to the room reflections and using your ears to decide which microphone works best.

4) Voice Over – A large diaphragm condenser microphone is required. These are more commonly found in recording studios and used for voice overs, singing, ADR etc. To match on set dialogue the same shotgun microphone can also be used.

Thats the microphone situations covered, now do you go mixer or recorder? its basically your choice. Mixers like the Soundevices Mix pre-d are a great addition. They enable you to have 2 high quality xlr inputs with independent controls, multiple outputs so that you can record the audio to camera and a separate recorder if you wish and best of all they allow you to monitor what you are recording along with highly visible level meters. There are plenty of companies that have started making mixers for the DSLR market, Sounddevices being at the higher end, but also Fostex, Juicedlink and Beachtek all providing similar systems at varying price points and abilities. These can also be used in conjunction with portable recorders to give greater control of levels and a cleaner sound goimg to the recorder as the microphone pre-amps are usually of a higher quality than those in the recorder.

Recorders like the Roland R-26 have 2 inputs allowing you to use 2 high quality microphones, they give you the ability to control the input recording level and they have onboard microphones which are great if you want to record a quick interview. The other major bonus of a separate recorder is that the analogue to digital convertors that take the audio signal into the unit so it can be recorded are generally of a better spec than those built into the camera (although this isn’t always the case). Other 2 channel recorders can be found from Zoom, TascamRoland and Sounddevices again all at varying price points and abilities.

The most important thing to remember when recording any audio is to make sure you can monitor what you are recording, not monitoring is the equivalent to setting up your camera and not checking you have framed the shot. If you can’t hear what you are recording how do you know that it is any good? Don’t leave it to chance, make sure you can hear exactly what is being recorded and invest in  a good pair of headphones.

If you are looking to record more than 2 sources at any one time (More on this in a later blog), it would be a good idea to make friends with a dedicated sound person, so that you can both concentrate on your dedicated areas of expertise, and get the best results possible.

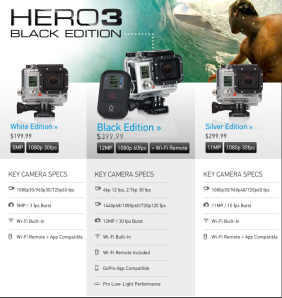
GoPro HERO 3 Action Cameras – Mic input?!?!?!

Well GoPro the makers of all things action camera have just updated their line with 3 new models. The Hero Black, Hero Silver and Hero White. All now have built in wifi for remote control as well as being smaller and lighter than previous models.

Now, what has me intrigued with these new beauties is this accessory – Yes, it is a usb to 3.5mm jack socket for ‘connecting any external 3.5mm microphone to your gopro’.

Unfortunately at present there are no other specs about this, so we cant know for sure if there are or will be any way to control the audio level, or if there will be any audio meters available on the new lcd add on touch screen or on the wifi app.

We can but dream… (or badger gopro until they implement it)